[vc_row][vc_column][vc_custom_heading text=”Adding a Custom Email Signature” font_container=”tag:h1|text_align:center” use_theme_fonts=”yes”][/vc_column][/vc_row][vc_row][vc_column][vc_custom_heading text=”Using Gmail or GSuite” font_container=”tag:h2|text_align:center” use_theme_fonts=”yes”][/vc_column][/vc_row][vc_row][vc_column][vc_column_text]An email signature if a fundamental part of every email. No doubt you have received some emails with some super creative footers or signatures. Are email signatures valuable, or are there just there for good looks? If you are using your email for business, and you have a logo, adding it could really all some branding power. Clients repetitively seeing your logo will help to cement your brand in their minds. It also makes it nice for clients to find other ways to reach you. Perhaps you list your social media accounts, direct phone number, or even a review us button. If you don’t have Gmail or Gsuite set up for your business then you need to read our post on Setting Up Gmail for your business.
Here is How to Add or Update My Email Signature
For the sake of keeping these directions accurate, we will be using the Google Chrome browser. This lightweight browser is powerful and has time-saving features. If you want to learn more, check out the post about Google Chrome in our blog.[/vc_column_text][/vc_column][/vc_row][vc_row css=”.vc_custom_1593910568362{margin-top: 25px !important;}”][vc_column width=”2/3″ css=”.vc_custom_1593910254634{margin-top: 25px !important;}”][vc_column_text]
Step 1
Go to Gmail.com and Log In to your account.
Step 2
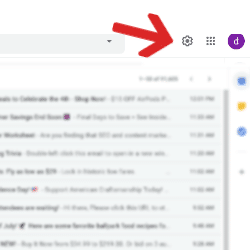
Click on the Settings Wheel located in the top right of the page. (Figure 1- This will open a settings panel)[/vc_column_text][/vc_column][vc_column width=”1/3″][vc_column_text]
[/vc_column_text][/vc_column][/vc_row][vc_row css=”.vc_custom_1593910574099{margin-top: 25px !important;}”][vc_column width=”1/3″][vc_column_text]
[/vc_column_text][/vc_column][vc_column width=”2/3″ css=”.vc_custom_1593910261287{margin-top: 25px !important;}”][vc_column_text]
Step 3
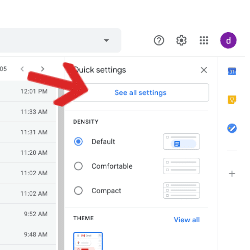
Then click “See All Settings” at the top (Figure 2) This will open up your “Settings” page. From this page, you can change the way your emails are sorted, filed, filtered, blocked, and even set up for offline access.[/vc_column_text][/vc_column][/vc_row][vc_row css=”.vc_custom_1593910580373{margin-top: 25px !important;}”][vc_column width=”2/3″ css=”.vc_custom_1593910282334{margin-top: 25px !important;}”][vc_column_text]
Step 4
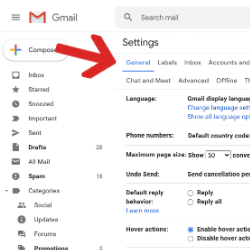
At the top of the page, make sure “General” is underlined. (Figure 3) We want to see the settings under this category.[/vc_column_text][/vc_column][vc_column width=”1/3″][vc_column_text]
[/vc_column_text][/vc_column][/vc_row][vc_row css=”.vc_custom_1593910592686{margin-top: 25px !important;}”][vc_column width=”1/3″][vc_column_text]
[/vc_column_text][/vc_column][vc_column width=”2/3″ css=”.vc_custom_1593910289278{margin-top: 25px !important;}”][vc_column_text]
Step 5
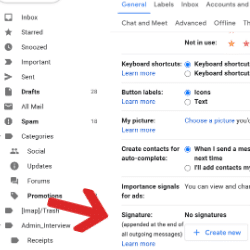
- Scroll down this page until you see the setting “Signature:” (Figure 4)
- If you have no signatures set up, then you will need to create a new one. Click “+ Create New” If you already have a signature, and you want to update it, simply click the pencil icon.
- Next, you will be asked to name your signature. This is important because you can have more than 1 signature set up. You can use them at different times which we will explain shortly.
- Then you can type your signature in the box to the right. You can change fonts, colors, sizes and you can even add links and images (like your logo as well)
- When you are done, you can choose when to use the signature you just created. For NEW EMAILS USE or ON REPLY/FORWARD USE.
[/vc_column_text][/vc_column][/vc_row][vc_row css=”.vc_custom_1593910599130{margin-top: 25px !important;}”][vc_column width=”2/3″ css=”.vc_custom_1593910295327{margin-top: 25px !important;}”][vc_column_text]
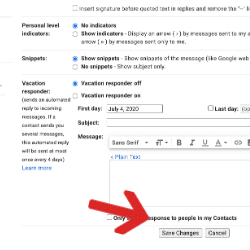
Step 6
When you are done, scroll to the bottom of the page and click “Save Changes”. This is very important, if you do not save and leave the page, you will lose your signature you created.[/vc_column_text][/vc_column][vc_column width=”1/3″][vc_column_text]
[/vc_column_text][/vc_column][/vc_row][vc_row][vc_column css=”.vc_custom_1593910303611{margin-top: 25px !important;}”][vc_column_text]
Test Your Email Signature
Once you have saved your signature, you will be taken back to your Inbox. Compose a new message. If you selected your signature to show up on new emails you will see it here.
Need to make an adjustment? Just follow the instructions above to go in and edit your signature.
Email Signatures For Business
If you run a business with employees, you may want all your employees to have the same email signature. This helps show teamwork, unity, and continues to build brand power and recognition. To update all your employee’s signatures, you need to make the updates through the Gsuite platform login. If you don’t know how to do this, and you need help, click the button below and we will help your get your business email account organized and unified!
[popup_anything id=”2275″]
[/vc_column_text][/vc_column][/vc_row]

